Sunday, November 3, 2013

Operation Christmas Child--Shoebox Time!!

This is my favorite time of year. For one, the weather is FINALLY getting cool in good ole south Mississippi. For two, it's time to start packing those Operation Christmas Child Shoe Boxes! That link will tell you all about packing a Shoe Box. 


I pack three Shoe Boxes every year, usually all for girls age 7-9. I can't remember why I decided on this number of boxes, I just go with it every year. You can pack as many as you want, that's the good thing about it. The other good thing about OCC Shoe Box time is that children all over the world get a gift for Christmas no matter who they are. OCC even provides boxes  you can pick up at your church (free of charge) or get through their website for a donation--they're called "Go Boxes."

This year I decided to put some homemade goodness into my boxes. I have to tell you I had a lot of fun making some of the goodies this year! I'll probably do it again next year--that's how much fun it was :)


Now, every year, I put the essentials in--soap, a wash cloth, toothbrush, toothpaste. Normally I get some lip balm, but I forgot for some reason, so I'll have to pick that up this week. I also include a brush, hair clippies,and barrettes. This year, I also made some elastic hair ties! I got the elastic from Elastic by the Yard, which sells fancy elastic in bulk. You can buy one yard, or you can buy ten. They have a great selection of solid colors and prints. The hair ties are super easy to make, and you can find the tutorial for those here.


(I also made the lovely cardboard packaging for the hair ties)

In addition to hygiene and beauty items, I like to include some school supplies--notepads, pencils, color pencils, erasers, and of course a pencil sharpener. Sometimes I stick some crayons and a coloring book in, but I ran out of room this year!


Now for more of the homemade goodies! Since I go with the girl boxes, I like to put some fun jewelry in. Normally, I buy this (FYI--you can get tons of stuff at The Dollar Tree for cheap so that you can fill up lots of boxes), but I decided on homemade this year. I found this great tutorial for a Chan Luu-style bracelet on YouTube. I couldn't believe how easy it was to make, so I made two for each box :)  I also found a tutorial for a wooden bead necklace here. Now, that blogger leaves her wooden beads plain, but I decided to paint half of each bead. (These are actually wooden balls, not beads). You can pick up the supplies at any Hobby Lobby or Michael's. And the other necklace I made is a Celtic heart knot. This tutorial I also found on YouTube. The findings (clasp, etc) I got at Hobby Lobby.


Finally, I always include some type of toy. Normally this is a small stuffed animal, but this year, thanks to Pinterest, I decided to make some plantation dolls. I followed the yellow brick internet road from Pinterest to this tutorial. You can get a lot of good Shoe Box ideas from Pinterest, by the way! The sewing kit I picked up at Michael's from their dollar bin--it is most definitely not homemade :)
 

And last but not least, there's always room for some gum and hard candy :)


National Collection Week for Shoe Boxes is November 18-25 this year. You can drop off your boxes at your church or at one of the drop-off locations. The suggested donation to help ship the boxes around the world is just $7.00 per box. That's not much considering you're giving a gift to a child who may never get one otherwise. Plus, OCC includes a Christian tract in each box--in the native language of the child. So you're also helping to share the love of Jesus with these children! Also, for the past few years, OCC has made it possible for you to know WHERE your boxes go! All you have to do is make the $7.00 donation online, and you'll get a label with a bar code. Once that box reaches it's destination, OCC sends you an email to let you know where your box(es) ended up!


I hope you'll consider filling up an OCC Shoe Box this year. It can make a huge difference in a child's life! Leave me some comments of what you put in your boxes--I can always use some new ideas!

Thanks for stopping by!

Wednesday, October 30, 2013

A Bear for Baby Duck

Long time no see! Once again, I probably get the award for World's Worst Blogger.

But today I have a special post. I've been busy the last couple of days working on a crochet bear for Baby Duck. Baby Duck is the 10 week old son of two of my friends. (And no--his name is not actually Duck, but since I didn't get permission from the parents, he shall be called Baby Duck. All of our friends will know who this precious baby is...)

I tried to match the colors in Baby Duck's room as closely as I could...hopefully they're pretty close!

Now, this is how far I got on the first pass (plus the arms and legs were made but not attached). However, on the first pass, I put the safety eyes in WAY too low, and he looked more like an alien than a bear. Trying hard to overcome my OCD tendencies, I decided to leave it as it was. It was a no go--after five minutes I couldn't take it anymore and had to unravel the whole thing to get the eyes out. (That's the good and the bad of safety eyes--good because your kids can't pull them out and choke on them, bad because they DON'T. COME. OUT!) So I started over, and here's the body...


Next I attached the arms and legs. As I started to attach the 2nd leg, I noticed that somehow I'd made it several rows longer than the other leg. Thankfully I only had to unravel a few rows to make it even with the other.

I didn't take any pictures of the nose portion of this operation before I attached it. But here is the completed bear! I love him!

I hope Baby Duck loves it!

Thanks for stopping by!

Monday, September 9, 2013

Pumpkin Time...and I am SO happy!!

Well it's that time of year again--PUMPKIN TIME!! I love pumpkin. Pumpkin anything. So when I found a pumpkin brownie recipe last year I was ecstatic. Well just a while ago, I thought, "What if I combine the pumpkin brownie recipe and the baked oatmeal recipe I love so much?" 

The answer--MAGIC! Yummy, yummy magic!!

I make my baked oatmeal in a muffin pan. It's just easier that way to pop them out and grab one on the go in the mornings. (But you can make yours in a baking dish if you just have to--I won't mind).


So here's the recipe:

Cocoa-Pumpkin Baked Oatmeal
(makes 18 "muffins")

Ingredients:
3 cups old fashioned oats
2 large eggs, beaten
1/4 cup cooking oil
1 cup milk
1/4 cup brown sugar
3/4 cup pumpkin puree (I use Libby's)
1 tsp baking powder
1/4 to 1/2 tsp salt
2 or 3 tsp vanilla (your choice--I use about 2 1/2 normally)
2-3 tsp pumpkin pie spice (level tsp)
2-3 tsp cocoa powder (heaping tsp)

Preheat oven to 375 degrees F. Spray muffin pans with cooking spray. 
Whisk together the eggs, oil, sugar, pumpkin, pumpkin pie spice, and vanilla until smooth.
Add the oats, baking powder, salt, and milk. Stir thoroughly.
Spoon mixture into muffin pan wells. Bake 20-25 minutes, until cooked through. (Generally I end up cooking it closer to 25 minutes, just because the bottom of the "muffins" doesn't like to set without 25 minutes of cooking).
Remove from oven and let cool. Eat and enjoy! 

(just hit me--what else would be good in these? semisweet chocolate chips from Ghirardelli mixed in!)

And just FYI--I have some new patterns in my Etsy shop! Go here to see them.

Thanks for stopping by!


Thursday, June 6, 2013

Another Concoction

So I got the new food processor out again last night! The other day, I had bought a bunch of peaches from some guys off the side of the road. (The peaches were DELICIOUS--tree ripened--YUM!)

Last night I realized I might not eat them all before they go bad, so I decided to make peachsicles!

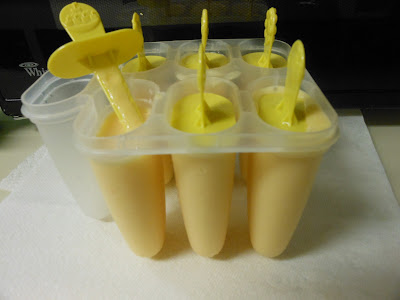
I peeled and cut up the peaches and pureed them. Then I decided to add a little 1% milk just for good measure. I got out my handy dandy popsicle maker that I have never used--until last night--and poured the mixture in. (I couldn't find the last popsicle stick...so only 6)

Here's the before...


And here's the after!


As soon as I got home from work today I pulled one out to try it. Honestly, it wasn't fantastic. But it was edible and tasted like peaches. My suggestion--if you make these, add some honey. Even though the peaches were ripe and delicious on their own, they just needed a little help in frozen form. But all in all--a good, all-natural, no sugar added treat!

Thanks for stopping by!